You Have One Life- Make it Shine!

You Have One Life- Make it Shine!
Showing posts with label Meal Prep Tips. Show all posts

Sunday, May 29, 2016

Roasted Garlic & Rosemary Burgers


Roasted garlic and fresh rosemary make these burgers extra flavorful. Adding grated ZUCCHINI to the lean ground beef helps keep the burgers moist, and is an inexpensive way to add bulk.

It’s almost undetectable, so it’s a clever way to sneak extra veggies into your diet. If you like the zucchini, experiment with adding a second grated zucchini! Try this with turkey burgers, too.

Ingredients:
1 whole garlic bulb
1 lb. raw 95% lean ground sirloin
1 medium zucchini, coarsely grated
6 fresh rosemary sprigs, leaves removed and finely chopped, stems discarded
¼ tsp. sea salt
½ tsp. cracked black pepper
4 whole-grain hamburger buns
4 slices medium tomato
4 lettuce leaves
4 red onion slices

Preparation:
1. Preheat oven to 400° F.
2. Remove outer papery white layer from garlic, keeping each individual clove covered, and keeping cloves attached to the bulb. Cut off top ½-inch of bulb. Place on a piece of aluminum foil; wrap to completely seal. Bake for 45 minutes, or until tender.
3. Preheat grill or broiler to high.
4. When cool enough to handle, peel away foil from garlic. Squeeze garlic into a large bowl.
5. Add sirloin, zucchini, rosemary, salt, and pepper; mix well. Shape mixture into four patties.
6. Grill or broil patties for 4 to 6 minutes on each side, or until desired doneness.
7. Top each bottom bun with a patty, tomato slice, lettuce leaf, onion slice, and top bun.


This recipe can be included in most any plan! Some popular plan break downs are below!! ENJOY

*Originally posted on Team Beachbody


Monday, February 15, 2016

February Fit Club! Easter Challenge!


Easter and SPRING is literally AROUND the corner! My challengers simply have gotten AMAZING results with these 21 day programs.  

I had amazing results with  the  21 Day Fix. I never thought I'd see my abs and there they were!! I was simply floored!  
21 Day Fix completely cleaned up my nutrition while not making me miserable.  The recipes were delicious and kept me feeling full! That was NEW for me!  I had a complete road map for what workout to do on what day and guess what?!  It was only 30 minutes a day.  No joke, start to finish.  How could I argue with that. I waste 30 minutes a day zoned out on some TV show.  I'm sure I could motivate myself to complete a 30 minute workout!  


So which one is right for you?  If you are getting back into fitness OR maybe already workout during the week but maybe it's more inconsistent?  21 Day Fix will challenge beginner to advanced fitness levels.  The key is in the fact there is always a MODIFICATION!  You can still have your "treats and cheats" foods and even wine! (Hooray! WINE!)

Have you already been working out, maybe done 1-2 rounds of the 21 Day Fix?  Crossfiter, serious runner or biker.  Looking to mix it up and really dial in results?  Then EXTREME is for you!!  BUT.... this is a no holds barred, 21 Day, strict program.  There are NO CHEAT DAYS here.  Awww come on! Its just 3 weeks and listen, if you want to dial it in for that big event and kick it up a notch?  THIS IS YOUR JAM! 

My next group begins on February 29th!  Do you have what it takes?  Apply below and I can get you all the details!  My groups provide EVERYTHING you need to be successful! They are PRIVATE and as interactive as you want them to be.  I never leave anyone without the tools they need to get started right!  It's like getting a cheat sheet for success!  (Lord knows I love a good short cut!)
My Amazing Challenger!!
So what do you need to do?  Fill out the form below, I'd love to talk with you more and get you in the group!  
Four months till summer!  Whats it gonna be?  More cover ups OR YOU meeting your goals!! Lets do this!! Apply and lets talk about what makes sense for YOU!

I am passionate about these programs because they simply WORK- no fuss, no muss.  You agree to learn this program and I'll be here to support you.  You will get results! Can't wait to see the progress in my next group!! That includes YOU!!


There are tons of Wufoo features to help make your forms awesome.

Monday, February 8, 2016

Zucchini Chicken Parmesan - Crock Pot

Ingredients

1.5 lbs (about 4) chicken breasts cut into cubes
1 Small Onion, Diced
1 Large Zucchini, Diced
1 Green Pepper, Diced
1 Tsp Garlic, Minced (or 1/2 tsp garlic
powder)
1/2 Tsp Onion Powder
1/4 Tsp salt (or to taste)
1 Tbs Italian seasoning
1.5 C Pasta or Pizza Sauce (or tomato sauce)
1 C Low Fat Shredded Cheese

Instructions

~ Spray your slow cooker with non-stick spray. Combine all ingredients but shredded cheese and stir to combine.
~ Cover and cook on high for about 3-4 hours or low for about 6-8, or until chicken is cooked through. In the last 30 minutes of cooking, add cheese and cook until it's melted.
~ Serve over pasta, quinoa or brown rice sprinkled with Parmesan cheese, if desired.

**For the 21 Day Fix
~ Measure out the chicken for your Red. 
~ Zucchini for your Green
~ Any added rice or quinoa for your Yellow.

~ If you use cheese, measure for your Blue!

If you are interested in learning more about clean eating- or even about an upcoming Challenge Group, apply below and I'll reach out with more information!

Hope you enjoy this recipe, comment below with questions!

Saturday, February 6, 2016

Creamy Mexican Chicken (21DF Approved)

Ingredients:

4 small boneless, skinless chicken breasts (may be frozen)
15 oz. can black beans, drained
7 oz. canned chopped green chilies
1 cup frozen corn
1 large onion, diced
3 bell peppers, chopped
15 oz. can diced tomatoes
Salt and pepper, to taste
2 tbsp. chili powder
1/2 tbsp. onion powder
1/2 tbsp. garlic powder
1 tsp. paprika
1 tsp. cumin
1 red container plain Greek yogurt
Fresh cilantroAdd chicken breasts to slow-cooker. Top with remaining ingredients, except for Greek yogurt and fresh cilantro.


Cook on low for 8 hours, until chicken breasts begin to fall apart easily.

Remove chicken and shred. Add back to crockpot. Add Greek yogurt, cover and continue to cook on low for 30 minutes. Stir well, top with fresh cilantro.

Serve with tortillas, or over quinoa or rice. Top with avocado or cheese with your blue container!

(21 Day Fixers: This makes 6 servings, and each serving counts as 1 red, 1 green, 1/2 a purple, and 1 yellow. Count additional "yellows" for tortillas and/or rice and quinoa.)

Classic Crock Pot Chilli (21 DF Approved)


Classic Crockpot Chili -- 21 Day Fix Approved!


Ingredients:

1 lb. lean organic ground beef
1 tablespoon minced fresh garlic
1 large red bell pepper, seeded and diced
1 large green bell pepper, seeded and diced
2 tablespoons chili powder
2 teaspoons cumin
1 (28 ounce) can crushed tomatoes
1 (15 ounce) can red kidney beans (rinsed and drained)
1 sweet onion, chopped
1/4 cup canned diced chilies or 1 fresh jalapeno pepper, seeded and finely chopped
2 tablespoons tomato paste
1/2 cup-1 cup water (optional)

Directions:

1. Cook the ground beef and garlic in a nonstick skillet breaking apart the meat with a spoon until well browned; drain off any fat then return to skillet.
2. Add in the bell peppers; cook until softened (about 5 minutes).
3. Add in the chili powder and cumin and stir to coat.
4. In the slow cooker, mix together tomatoes, beans, sweet onion, chilies and tomato paste, then stir in the beef mixture.
5. Cover and cook on HIGH until flavors are blended (about 4-5 hours). If your chili looks too thin at the end, feel free to add some water to thick it out a bit.

(Source: adapted from Food.com)


21 Day Fixers, this recipe has 6 servings. Each serving = 1 red, 1 green, 1 yellow, and 1 purple

Wednesday, February 3, 2016

Cauliflower Bread Sticks

To-die-for mock breadsticks made with cauliflower that are low in calories, carbs and fat. I found this AMAZING recipe on-line, tried it for Super Bowl an Boom- its a favorite!Phenomenal low carb alternative to traditional cheesy breadsticks. These cauliflower breadsticks are full of flavor, cheesy and easy. And you can pick them up by hand!  My kids loved them and its hard to believe they come out so well.  Might take you a round to get the hang of it- one tip is to be sure you don't press the mix too thin.  You wan them on the thicker side when you bake!
Ingredients
1 head cauliflower, large (7" - 8" wide)
1/4 cup egg whites
1/2 cup + 3/4 cup (for topping) Mozzarella/Tex Mex cheese, shredded
1 tsp Italian herb seasoning or any dried herbs like rosemary, basil, parsley
1/4 tsp freshly ground black pepper
Pinch of salt
Marinara sauce for dipping
Start with a large head of cauliflower, 7″ – 8″ wide. If you are serving 2 or more people, I recommend do double the recipe. These breadsticks are so good and guilt free, they disappear fast. Chop the cauliflower and process in a food processor until “rice” texture. Do not make a cauliflower mash. Alternatively, if you do not own a food processor, you could chop it really fine or even grate using simple boxed grater.
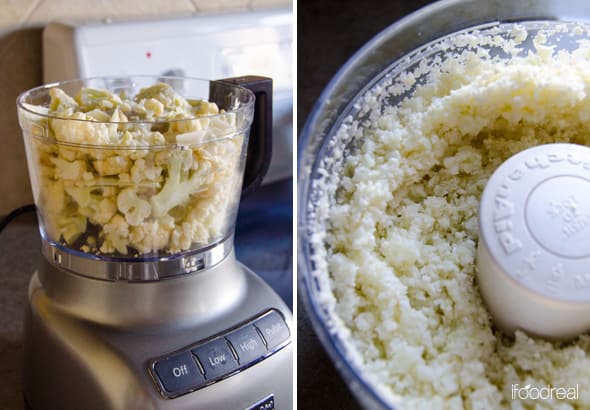
Place cauliflower in any oven proof baking dish and bake for 20 minutes at 375 degrees F. Alternatively, you could microwave or steam it. The idea is to cook the cauliflower, so it releases the moisture and we squeeze it out.
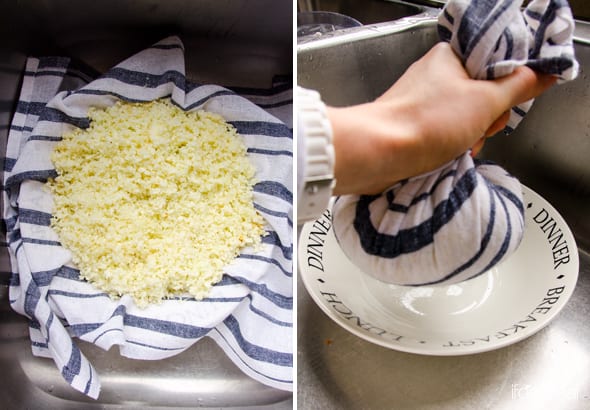
Line a bowl with a linen kitchen/tea towel. I used cheap tea towels from a Dollar store. They are called something like glass tea towels and are kind of linen mesh. Much better than cheesecloth as they do not rip and are widely available. You probably have some on hand. 
Then you grab the towel by the corners, holding with one hand just below the corners, and start squeezing the liquid out with another hand. The process will take about 3 – 5 minutes and you should squeeze about 1 cup of liquid. Use a measuring cup as a point of reference. If the liquid is hot, let the cauliflower mash cool down a bit and proceed again.
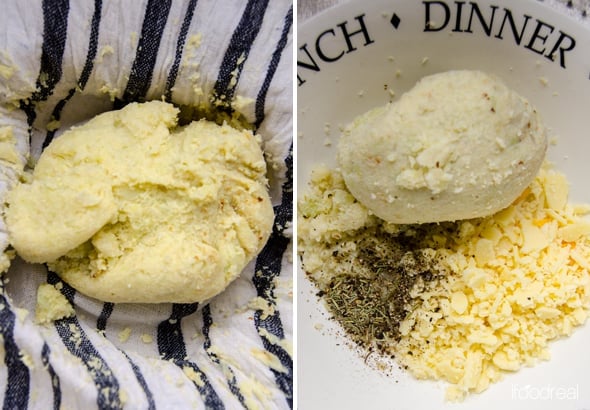
Here you can see, from right to left: cauliflower “ball” before squeezing, after squeezing and liquid squeezed out.
Open the towel and voila: you got yourself some pretty dry cauliflower. Add seasonings to it as per the recipe. I used egg whites instead of an egg and it worked! Any cheese works. Full or low fat, Mozzarella or Tex Mex or even Parmesan. Use grated or shredded cheese and when measuring do not pack.
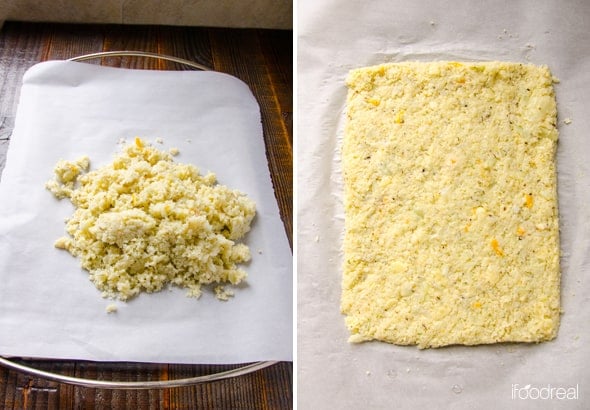
After you make the “dough”, transfer it onto any baking sheet lined with parchment paper. The “dough” won’t be sticky and that’s OK. Egg whites and cheese will act as a binder during the baking process.
No need to spray the parchment paper with cooking spray either. The breadsticks won’t stick. More than that, the parchment paper underneath the breadsticks will be moist after baking. And that’s OK too. It doesn’t mean the breadsticks will fall apart. No. The moisture releases during the baking process therefore no need for cooking spray. I was asked before if pizza stone would work and I don’t know as I don’t own one. No idea how to use it.
Form a rectangle, using your hands, approximately 9″ x 7″ in size and 1/4″ thick. Press the “dough” a bit to make it stay together and use spatula to make the edges straight. Do not worry, the egg whites and cheese will bind everything together during the baking process. It won’t fall apart.
And bake. All ovens vary. I own simple electric oven and it took the breadsticks 18 minutes. Just watch it => when you see the “dough” becoming golden brown on top, it’s time to take it out. Then you top the breadsticks with cheese and bake for another 5 minutes until the cheese melts and broil for nice golden brown crust.
Remove the breadsticks from the oven and transfer to a cutting board, holding by the ends of parchment paper. Let the breadsticks cool down for 5 minutes before cutting, if you can. I waited with the first batch and the breadsticks were easy to cut. With the second one I didn’t and it was a bit of a mess. Use serrated/bread knife to cut into 12 breadsticks.
We served ours with marinara sauce- up to you what sides you choose to serve them with!
Another idea is to make these cauliflower breadsticks even lighter in fat by skipping the cheese topping. And that’s what I did with my second batch. Below I have included 2 nutritional information

These cauliflower breadsticks turned out delicious!!! Full of flavor and cheesy. They hit the spot and satisfy the craving without wrecking your daily macros/nutrition. You can have 5 – 6 of these and still have consumed very little calories, fat and carbs. Enjoy!Nutritional Information (no Cheese)Servings 12; Amount Per Serving - 1 Breadstick; Calories: 33.3; Fat:0.9; Cholesterol: 2.5 mg; Sodium 48.4; Total Carbs: 3.8 g; Protein 3.1 g. Nutritional Information (With Cheese) Servings 12; Amount Per Serving - 1 Breadstick; Calories: 53; Fat:2.2; Cholesterol: 6.2 mg; Sodium 107.6; Total Carbs: 3.8 g; Protein 4.9 g. 
Originally posted on iFoodReal.com

Tuesday, February 2, 2016

Buffalo Chicken Tenders

I was lucky enough to come across this recipe while I was cleaning up my nutrition! They were a MAJOR score for the entire family!!


Seriously, these tangy, spicy chicken tenders dipped in creamy blue cheese sauce are delicious enough to make you forget they’re only 158 calories per serving!! The blue cheese sauce is darn amazing too!! Feels like cheating!

Total Time: 50 min.a
Prep Time: 5 min.
Cooking Time: 15 min.
Yield: 4 servings

Ingredients:
4 Tbsp. hot pepper sauce (like Frank’s®), divided use
2 Tbsp. white vinegar
1 tsp. garlic powder
1 tsp. paprika
1 dash cayenne pepper (to taste; optional)
1 lb. raw chicken tenders
¼ cup nonfat plain yogurt
1 Tbsp. crumbled blue cheese
4 medium celery stalks, cut into sticks

Preparation:
1. Combine 1 Tbsp. hot sauce, vinegar, garlic powder, paprika, and cayenne in a small bowl; mix well.
2. Add chicken; toss to coat. Marinate, covered, in refrigerator for 30 minutes.
3. Preheat oven to 375° F.
4. Place chicken in a baking dish. Discard any remaining marinade. Bake for 12 to 15 minutes, or until chicken is no longer pink in the middle.
5. Combine yogurt and cheese in a small bowl; mix well. Set aside.
6. Combine chicken and remaining 3 Tbsp. hot sauce in a large bowl; toss gently to blend.
7. Serve chicken with dip and celery.

Originally posted by One Fit Fighter

Would you like more clean recipes and daily accountability to achieve your health and fitness goals? Let's work together! Complete the application here!

Sunday, December 13, 2015

Banana Oat Pancakes!


Clean and plan approved! Can't go wrong with this crowd pleaser!

1C Unsweetened Almond Milk
2 Large Egs
1 Large Ripe Banana
1 tsp. Vanilla Extract
1tsp Baking Powder, gluten-free
1/2 tsp Ground Cinnamon
1 Dash Sea Salt or Himalayan Salt
2C Old-fashoned rolled oats, gluten-free
1/2 tsp Extra virgin Organic coconut oil
3C Fresh Mixed berries

Place Almond milk, eggs, bank, extract, backing powder, cinnamon, salt and oats in a blender; cover. Blend until smooth.
Heat oil in nonstick skillet over medium-low heat.
Pour 1/4 cup batter onto the skillet; cook for 2-3 minutes or until bubbles form around the edges of the panckake.
Continue with remaining batter
Service with Berries!! (recipe from “Fixate”)

Serves: 8- 2 Pancakes each!
Container: 1 Yellow 1/2 Purple

*Leftover pancakes can be reheated in a toaster!


Saturday, December 12, 2015

Shakeology Mixology 101


 I was not a pro the first time I mixed my Shakeology! Now I know WHY! I didn't use a blender, I didn't use enough liquid.  I also didn't know I could add ice or even a teaspoon of peanut butter! YUM! I hope this helps you to have a better 1st experience than I did! I haven't missed a day in almost 2 years and my results show for it!

Enjoy!

Monday, June 29, 2015

Clean Hearty Beef and Butternut Squash Stew


Makes 6 servings, approximately 1 1/4 C each.
1 Tsp. Olive Oil
1 1/2 lbs. raw lean beef stew meat, boneless cut into 2" cubes
1 Medium onion, chopped
1/2 green bell pepper, chopped
1/2 red bell pepper, chopped
4 cloves garlic, crushed
2 medium tomatoes, chopped
1 cup low-sodium organic beef broth
1 bay leaf
1 tsp. sea salt or Himalayan salt 
1 tsp. ground black pepper
2 cups cubed butternut squash
1/4 cup chopped fresh flat leaf parsley


Heat oil in a large saucepan over medium-high heat. add beef, cook stirring frequently for 4-5 minutes or until beef is brown. 

Add onion and bell peppers; cook, stirring frequently for 4-5 minutes or until onion is translucent. Add garlic, cook, stirring frequently for 1 minute. 

Add tomatoes, broth , bay leave, salt and pepper.  Bring to a boil. Reduce heat to medium-low, cook covered for 40 minute. 

Add squash; cook, stirring occasionally for 8-12 minute or until sauce has thickened and beef is fork tender.

Remove bay leaf, serve topped with parsley.


**I found this to be a very satisfying dish. Its also 21 Day Fix Approved and breaks out to:
1 Green
1 Red
Per serving! 


If you aren't into spicy dishes cut back on the pepper by 1/2.  Enjoy!


Tuesday, January 27, 2015

Shakeology Breakfast Bars


Love this recipe!  I was looking for something  to switch things up a bit and this is a WINNER!  You can sub the raisins for Craisins and the Almond Milk with plain water as well.  I only had regular Shakeology on hand as well, not vegan. 

Another tip is to spray the pan with non-stick spray.  I used Coconut oil and I also sprayed a sheet of wax paper to help press them into the pan with less mess.  Give them a try and.... Enjoy!!

Friday, January 23, 2015

Challenge Groups WORK!

So if you told me that I would EVER post my before pictures when I took them, I would have told you NO WAY!  But now I'm so proud of, not only how far I have come, but the hard proof of how these programs work.

What was my secret? I can't lie it is all.....


W O R K!

There is no miracle pill, or crazy plastic wrap.  It takes the right calories in and work.  Now at one point in my life I would have believed it would take no less than 3 hours per day to achieve results.  But another wonderful thing that comes with age is the wisdom of working smarter, not harder.  I work out no more than 30 minutes per day.  PERIOD.  I think any of us can find 30 minutes in our day.  

You can achieve balance in your life, at home, work, school, time for family, time for yourself!

One thing I will say is that I LOVE that I have a blueprint for success.  And not only is it realistic but its manageable.  The difference in my fitness journey was joining a private Challenge Group!  That held me accountable and gave me a safe place to ask questions and learn tips and tricks I didn't have before.  We were in it together, through the ups and downs.  If they did get off track we were there to listen and help plan how they could find their way back.  

If you would like to know more about my Challenge Groups and how you can begin your fitness journey, reach out to me 
-----> HERE.
Fill out my online form.
There are tons of Wufoo features to help make your forms awesome.

Tuesday, January 20, 2015

How to make your own miso soup!

This is a dish that I have come to love!  White miso paste is readily available at your local whole foods store. There are many other alternative grocery stores that you can find it in as well. They sell me so powder in the supermarket but I think you lose many of the health benefits of actual live miso paste. 

The four stages of making your own miso soup!  You start with: 
1 TBSP of White Miso Paste
2 TBSP of dry Wakeme seaweed
1 Diced Green Onion
Next add 2 cups boiling water
(I heat mine in a teakettle)
Then you let the magic begin as the seaweed rehydrates into lovely flat noodles like pieces. I season with a dash of Braggs liquid amino's (A better for you so I sauce alternative) and Himalayan salt. ENJOY!!

Tuesday, December 23, 2014

Prepare: Mechanics of Meal Prep- You and the Kids

Meal preparation is something that I have to boiled down to a science.

  Everyone does it a little differently and I don't think any one way is right. What works for YOU is what is right. 

For instance, I purchase all my groceries  on Sunday and usually do most of my cooking for my families lunches and snacks on that day.  I make sure I have available healthy foods so we can plan dinners day to day.  Others like to shop for only a few days at a time and prepare on the fly.  Our household doesn't allow for that luxury so I need to make sure we get the bulk of he cooking done on Sunday. We are so busy during the week, I need to be able to just throw things in lunch bags and go. The more prepped they are the better.  It not only helps me to stay on track. But it also gives the kids more healthy options than picking lots of over-processed crackers and chips out of the cupboards.   


Now I'm not hating on convenience foods. My family surely has used them in the past and leaned on them a lot.  I just changed my definition of convenience food a bit. I would rather pay a little extra to get some pre-cut veggies or fruit if needed.  (Cut apples or pineapple.) Versus boxed graham crackers and chips. I always make sure there is a "dip" of some sort that is either a healthy fat (hummus) or fat/protein (peanut butter). My daughter is really sensitive to sugar and if she has too much we have issues and if she doesn't have enough.... you get the picture.   so having some of theses easy to grab items around makes a big difference to how the week runs.

I also have been known to pickup these Perdue chicken cuts ready to go if we are in a crunch and I need a protein source for my salads or with my steamed veggies.  

Lately I've been leaning more towards white fish, Tilapia, Cod etc... but sometimes you need to do what is faster and make the best, healthy decisions.  

I also may bake a turkey breast for the week.  I can cut it up for sandwiches or use it for lunches as well.  

For the kiddos, they are fans of tuna also, so cutting up celery and shredding carrots to mix in there is a great option to give them added veggies and satisfy "crunch" without salty chips and processed snacks.  I really try to limit those in the house simply because they cause more issues and move us farther away from having the kids explore other options. 

Finally one of my newest kid favorites... 


Each tube has 40-50% less sugar than the leading tube yogurt with over twice the protein.  No artificial sweeteners, colors or preservatives.  We have taken to putting them in the freezer and the kids like them as a frozen yogurt snack. 

You need to do what works for your family and take it in small steps.  It's never a long term success if you just sweep the cupboards clean and turn it into a punishment for everyone.  Take it one day at a time and start making better choices and it will compound and you'll see some really positive changes! 

Sunday, November 30, 2014

Prepare for Success: Packing Your Meals!

 So first and foremost, I'm not shy about dragging my bag of food with me where ever I go. Or my  48 oz water bottle!  You have to plan for success, and this is how I do it.  A typical day on the 21 Day Fix looks like the above picture.  Excluding breakfast and dinner, I have three snacks and my lunch which carries me thru the day.  

This was not an easy process to begin with, it took some perfecting, even finding the right lunch bag! My favorite is The Lunch Break Thermal one from 31 Gifts! It's big enough for all my food, even my Shakeology cup! Insulated and neat.  Click HERE to see the bag- it can be ordered in a variety of colors!

Then the tupperware/plastic bag combo.  I am pro environment so I want to reduce the amount of plastic I use and do more reusable.  In a pinch I do use plastic bags from time to time.  But its also about finding the right tupperware as well.  My go to has been the reusable Glad containers since they are lightweight and stack neatly.  They make mass production meal prep a tidy snap.

Finally I use my All Day Organizing Tote also from 31 Gifts to condense my lunch, shoes and water so I can carry it in the office.  I always have my laptop bag and files as well.  But I've boiled it down to a science and I swear I don't have to struggle with the process any more.  Once you find a system, use it!  

Hope this helps you figure out a way to make it all work!


Monday, October 6, 2014

Food Prep: How to Measure a Portion

One of the challenges I had while learning Meal Preparation was how to determine a serving size. I would measure by cup and try to eyeball the measurements. But that is very difficult to measure with cups as well.   Remember that every new skill takes time. I hope the little lesson gives you a shortcut for something I wish I knew earlier!

So for instance, my steamed vegetable bag would say 4 servings of green beans but damn if I could get 4 out of the bag!

The best investment I made was a chefs scale. You can measure by ounces or grams and once you get the hang of it, it's no big deal. 


The food scale became my friend. This has simplified my meal planning immensely. I want to show you how I use it. 

First of all any container you use, you put on the scale and you can zero out the weight so you don't have to accout for the added ounces. (Example in the above picture- the container weighs an 1/8th of an ounce.)


When measuring a serving of green beans the stream bag says 2/3 C or 85 Grams. This is how I weigh the serving size.  Now before I add my protein I zero out the scale again. 
I add the turkey, 6 oz. and finally I can finish it with grape seed oil and Ms. Dash and there is my prepped meal. 

The goal is not to dirty multiple containers, just one to measure my ingredients in the same container I would prep my meal.  Voila!! Lunch is served!